Create a Simple (to use) Blog
The goal of what I’m trying to accomplish is simple. I’d like a simple way to generate website content that I can do from my laptop, my iPad, or any other device in a pinch. Here are the questions I asked myself:
Defining the Goals
Content
I generally will be publishing tech related articles that will most likely boarder on the realm of documentation. I have previously worked with Markdown as a tool for creating documentation, so I know it can handle a wide array of formats and is easy to show code samples in.
How to Create
I’d like to be able to generate it on the go, via my iPad Pro. While this isn’t ideal in most cases and I will usually be on my laptop. The freedom and flexibility of the iPad should be a great device to be able to make contributions from.
Work Anywhere
When looking at this question, my first reaction was git and GitHub. I like the distributed nature of it and GitHub offers a “good enough” editor to make content from any computer in a pinch.
This would also allow me to version the site, roll it back to a previous state if anything went wrong, and help manage conflicts across devices as I created content. While not as powerful as being able to live-edit things like Google Docs, when it is primarily one person contributing, it should work fine.
WYSIWYG
This is where MKDocs shines. The built in web server it has to preview your site works great on a PC and there are plenty of Markdown editors to choose from, even on the iPad (I have been using iA Writer and it works well).
Publishing
GitHub seems to be a perfect candidate for this, they have a “release” cutting system based on git tags and they have recently opened up GitHub Actions for free, giving me a CD solution to checkout the repository, download MKDocs and its dependencies, build the static website, and upload the static folder to a multitude of providers.
Serving
Give that the site truly is static, I don’t need any software below it to generate pages. This helps keep the site simple and keeps costs low. I chose S3 from AWS for the lost cost, GitHub Action Support, lots of examples of static site hosting, and I’m already using it for other projects.
Bringing it together
At this point I have a pretty good model in my head for seeing how this will all work together.
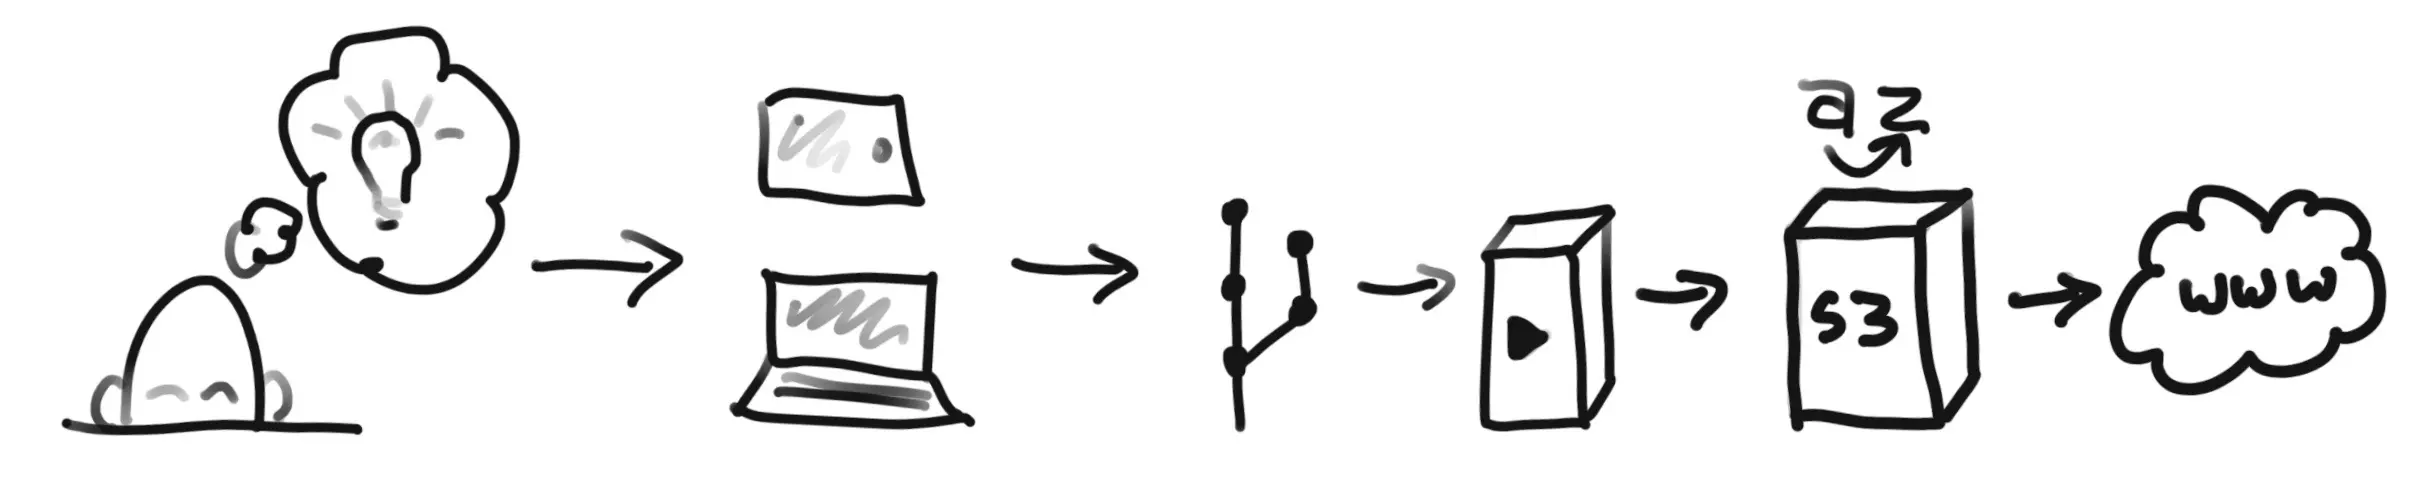
The Plan
- Come up with an idea
- Write it on any device
- Push it to a git repository
- Review it
- Bundle it up into a release
- Build the static HTML
- Deploy it to an S3 Bucket
- Invalidate and propagate it to CloudFront
- Deliver it via HTTPS
Things We Used
- Python/pip 3
- MKDocs, wheel, mkdocs-material, markdown-include, mkdocs-awesome-pages-plugin, mkdoc-material-extensions
- GoDaddy for a domain
- AWS S3 for static site storage
- AWS CloudFront to deliver it via CDN, and add HTTPS support
- AWS Route 53 for DNS
- GitHub for hosting the Repository, Code Review, Release Management, Storing Secrets
- GitHub Actions for doing Deployment
See simple... right. 🙄
Installing or Upgrading Homebrew, Python, and Pip
For my installation I needed to install a newer version of Python. This can be done through Homebrew.
Some MacOS users
After using Homebrew to install python, you may need to use python3 and pip3 for all the commands below.
# If you need to, install Homebrew
/bin/bash -c "$(curl -fsSL https://raw.githubusercontent.com/Homebrew/install/master/install.sh)"

# Install Python 3, if it is all ready installed use `brew upgrade python`
brew install python

# Next your should see what python you are running
python --version

# Next upgrade pip, you make also need to add `sudo`
pip install --upgrade pip
Installing MKDocs, Material Theme, and some Plugins
# Next install mkdocs
pip install mkdocs

# Next install the material theme
pip install mkdocs-material

# Next install markdown include
pip install markdown-include

# Next install awesome pages
pip install mkdocs-awesome-pages-plugin

# Install Material Extensions
pip install mkdocs-material-extensions
Additional step might be required
I also had to install wheel, I'm unsure why this wasn't included in the mkdocs install as it is a prerequisite. But you will see this install included in my GitHub Actions s3.yml file later on.
pip install wheel
Getting your Repository Ready
Now you are ready to start deciding where and if you are going to use a source code versioning tool like Git to manage these markdown files.
From personal experience, I always code inside a Git Repository out of habit1 and I believe it is part of a healthy development life-cycle, even if you are the only one working on a project. Having a Git Repository helps save you in the scenario when you lose a computer or work on two separate computers, allowing you sync and transfer work between the two more easily. Using GitHub, give you the added flexibility to work from any computer by using their build-in IDE.
Once your git repository is set up, move into the folder and run the following to generate the scaffolding of a MKDocs project.
cd /path/to/your/folder
mkdocs new .
How are you going to edit?
This one I went down a few avenues before I found what works best for me. I like Visual Studio Code for it's powerful tools and simplicity. Now there are some really awesome WYSIWYG MarkDown editors available these days, but I haven't found one that is easy enough to set up when trying to get it to render with a MKDocs Themes applied. For me that is the only good way to really see your website come to life. VS Code gives you some in-line styling, but doesn't get in your way and lets you get through writing these MarkDown files quickly and efficiently.
I'd also suggest installing the Markdown All in One. It gives you a preview in VS Code. While it doesn't have the ability to fully render the theme, it does let you see enough to know what you are doing is valid.
Getting Live Previews Working
One of the best features on MKDocs is the live and local server it can create. It has the added bonus of automatically reloading the page when you save a file in you site, meaning that you are never viewing an out-of-date version of the site. It makes editing and getting the formatting right easy as you can valid on the fly.
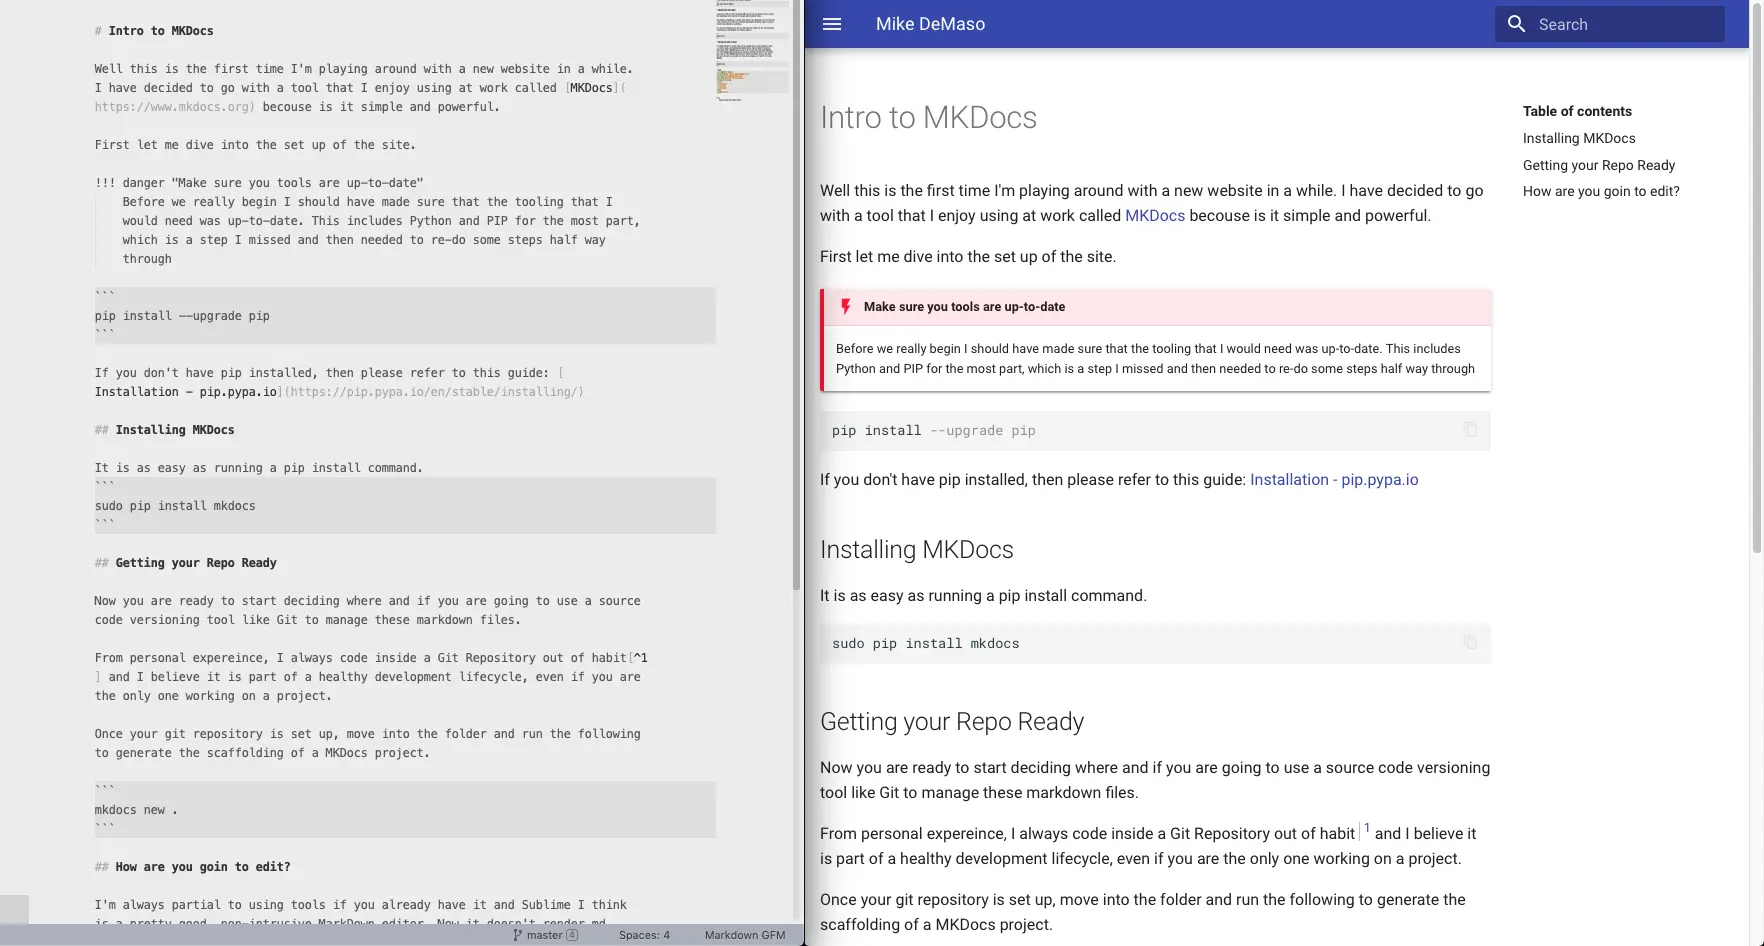 IDE and the live preview of
 mkdocs serve side-by-side.
All you need to do is run the command to start the server while in your project root, meaning where your mkdocs.yml file is located.
mkdocs serve
Now direct your browser to http://127.0.0.1:8000 and you will see your MKDocs site come to life. Every every time your save you work to your disk, the browser will reload and the new changes will be show to you. This makes it very easy to quickly add content and see how it looks before pushing it out to a server and dealing with setting up a development server.
Configuring your installation of MKDocs
Now is your opportunity to add features, set your theme, and set some site wide meta-data for your soon-to-be-generated site. Here I'm providing an example of a yaml that will get you close to a mirror of my website.
You can see the settings for changing the language, theme, and colors. These will help give your site a feeling of your own. I encourage you to research more settings and configurations. I'm scratching the surface with these and depending on the theme you choose there could be many more options for you than I'm showing.
site_name: Your Site Name
site_author: Your Name <yourname@email.com>
site_url: http://www.yourwebsite.com
copyright: Copyright 2019 Your Name
plugins:
  - search
markdown_extensions:
  - pymdownx.emoji:
      emoji_index: !!python/name:materialx.emoji.twemoji
      emoji_generator: !!python/name:materialx.emoji.to_svg
      # Resource for icons: https://squidfunk.github.io/mkdocs-material/getting-started/#icons
  - meta
  - admonition
  - footnotes
  - codehilite
  - pymdownx.superfences
  - markdown_include.include:
      base_path: docs
theme:
  name: material
  language: en # The language your site is written in
  palette:
    primary: 'light blue' # Used as the main color for the site top bar,
                          # links, etc...
    accent: 'deep orange' # Used as the highlight color for the site
  logo: 'assets/logo.png' # This is the location of an image
                          # for use as the site logo in the theme you choose
  favicon: 'assets/logo.png' # This is the image used by browsers to identify
                             # your tab to the user
Generating your new site
Once you have created some content you can now generate your site.
mkdocs build
After running that command you should now see a new folder, site, in your project root. At this point I suggest you add this folder to the .gitignore file in your project, in order to keep this out of your source control. I recommend this because running the build command makes a copy of almost everything in your project, including images and other non-source control friendly files that will artificially bloat the size of your repository.
Deploying your site
For my setup I chose to go with AWS S3 as an object host, setting it up as a static website host, this will site behind an AWS CloudFront CDN, using an AWS Certificate to enable HTTPS, using Amazon DNS servers via Route 53, and a GoDaddy Registered Domain. As for deploying the site to the S3 BBucket, GitHub Actions will be used as my build environment. I'll use GitHub's release functionality as the mechanism to trigger the Actions and actually release. This last step I may move to being auto-fired oon merges to master, but for now I like being able to bundle a few changes together.
Setting up AWS
TBD
The first step is finding a hosting solution for you. Luckily, MKDocs generates a very simple HTML and folder based website for you to host, pretty much anywhere. From servers you run yourself to AWS, these are very straight forward to get hosted.
The tricky part is finding a manageable way for you to check your changes into your Git Repository and have it automatically build and deploy your code to a server, male this process as easy as possible.2